After installing angular in your local system follow the below procedure.
Step1:
Create a new angular application:
ng new angular-app
Angular application view
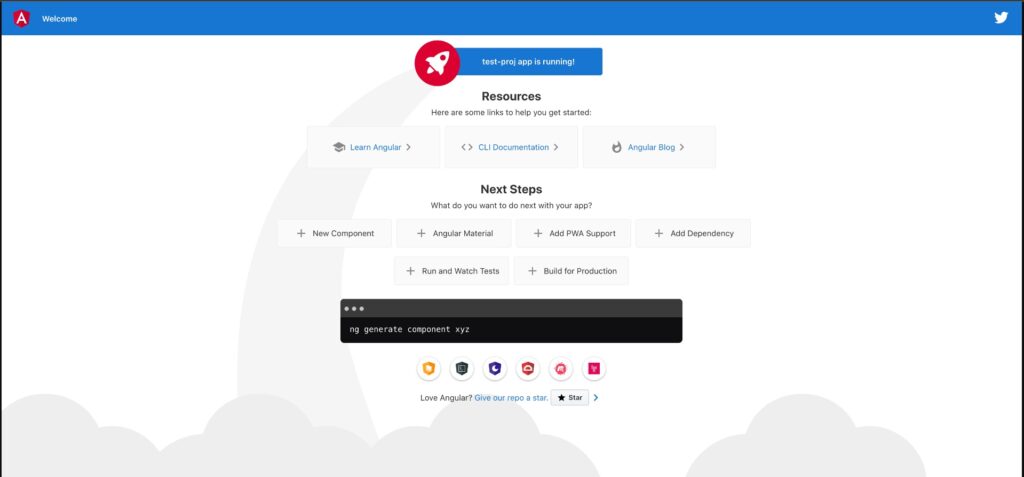
Step:2
MySQL Database:
To be able to experiment with the code examples, you should have MySQL installed on your computer.
You can download a free MySQL database at https://www.mysql.com/downloads/.
Install MySQL Driver:
Once you have MySQL up and running on your computer, you can access it by using Node.js.
To access a MySQL database with Node.js, you need a MySQL driver. This tutorial will use the “MySQL” module, downloaded from NPM.
To download and install the “MySQL” module, open the Command Terminal and execute the following:
First, install npm and then install MySQL
Create Node.js App:
First, create a folder and name it MySQL -database.
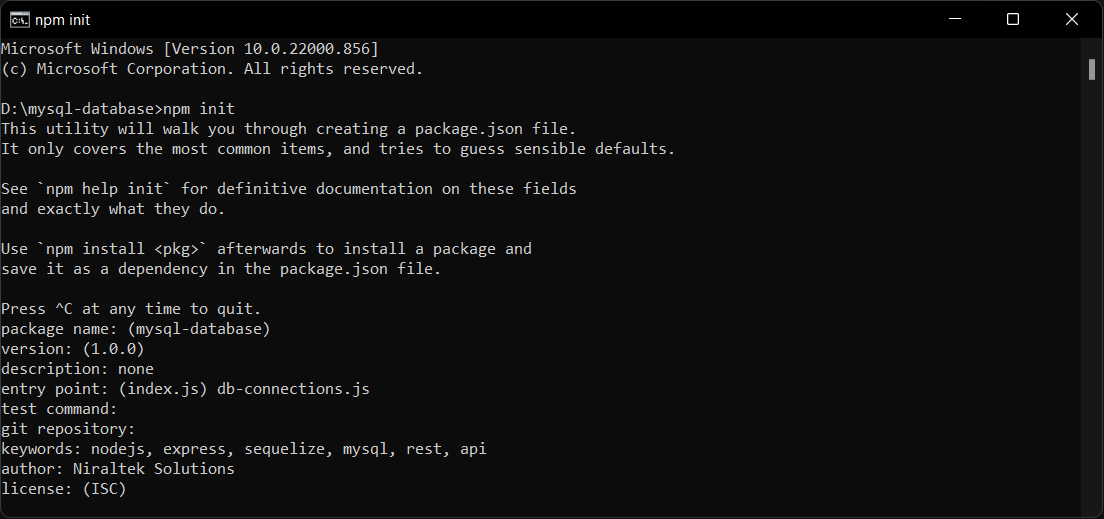
Next, we initialize the Node.js App with a package.json file:
npm initpackage name: (mysql-database)version: (1.0.0)description: noneentry point: (index.js) db-connections.jstest command:git repository:keywords: nodejs, express, sequelize, mysql, rest, apiauthor: Niraltek Solutionslicense: (ISC)About to write to D:\mysql-database\package.json:
NPM Install MySQL:
We need to install the necessary modules: express, sequelize, mysql2. Run the command:
npm install express sequelize mysql2 cors --save
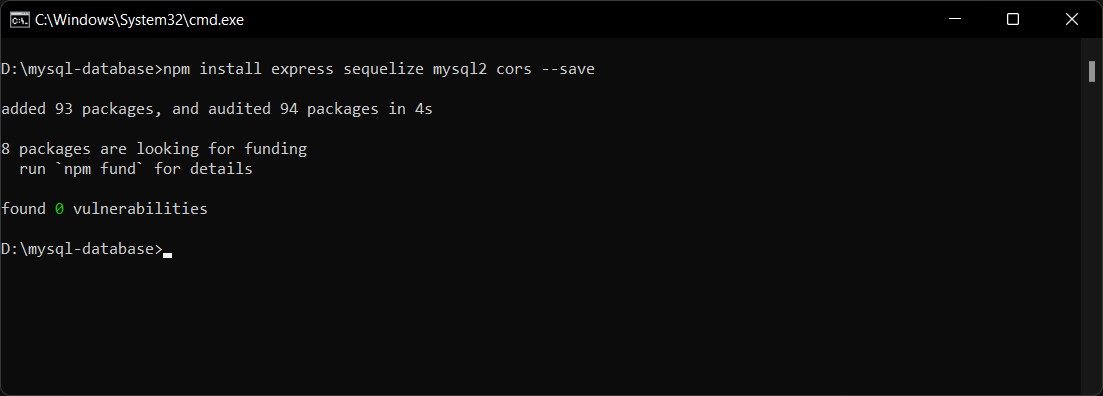
Now you have downloaded and installed a MySQL database driver.
Node.js can use this module to manipulate the MySQL database:

Create Connection:
Start by creating a connection to the database.
Use the username and password from your MySQL database.
db-connection.js
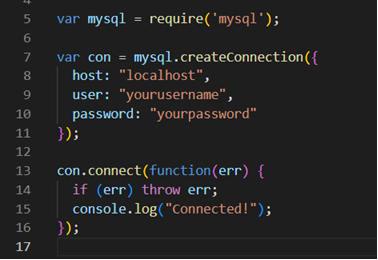
Save the code above in a file called “db_connection.js” and run the file:
Run “db_connection.js”:
Which will give you this result:
node db-connection.js
Now you can start querying the database using SQL statements.
Database Query:
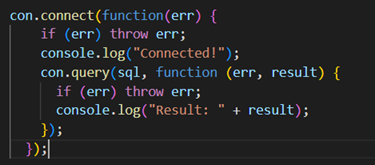
The query method takes an SQL statement as a parameter and returns the result.
Step3:
After that just upload the source file to Github[Hope you have created an account on Github.com and a new repository. Install Git in your local system as well].
Git ADD file:
All files should be added to GitHub
git add --a
Git Commit:
The git commit command captures a snapshot of the project’s currently committed changes.
git commit -m "first-commit"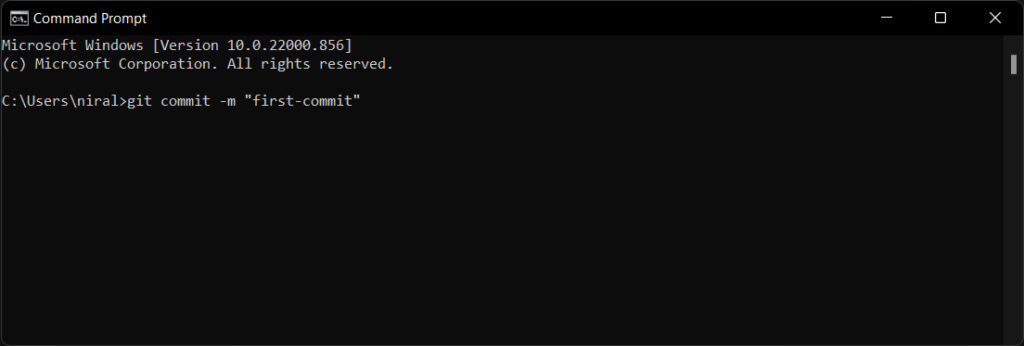
Git Push:
The git push command is used to upload local repository content to a remote repository. Pushing is simply transferring commits from your local repository to a remote repo. This is parallel to receiving the kit, but receiving imports commits to local branches, pushing exports to remote branches.
git push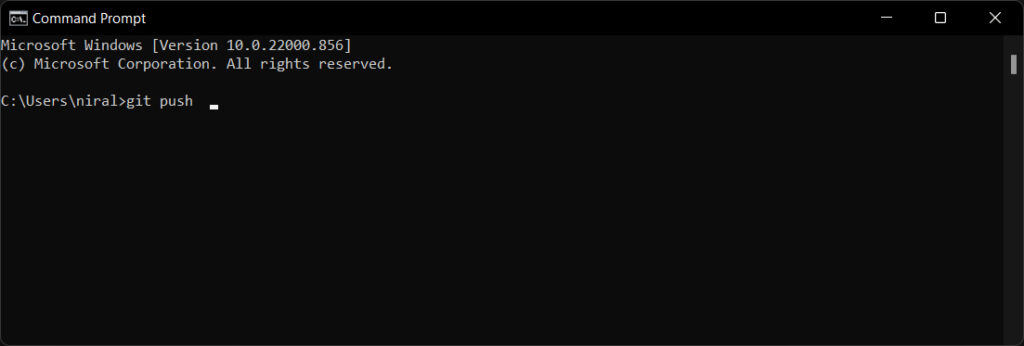
Step4:
Create AWS EC2 Instance:

AWS has made launching EC2 instances an easy task, but there are still many steps to the final result. Learn how to successfully create an EC2 instance from AWS Console.
Select a region:
One of the most important steps is to select the desired AWS region. This can be done from the top navigation bar of the AWS Console.
Navigate to the EC2 Console:
Once you select the desired AWS region, go to the EC2 Console. From the same landing page, search for EC2 (Figure 1). Your landing page in the management interface will likely display EC2 among the most commonly used services in the account.
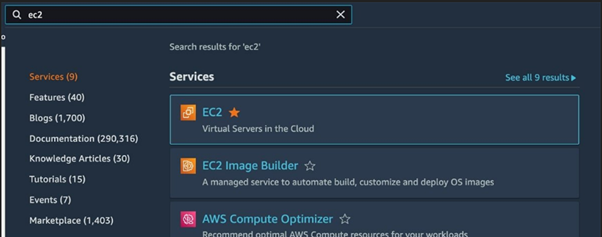
(figure 1)
Once you arrive at the EC2 Console, from the left navigation menu, choose the Instances option.
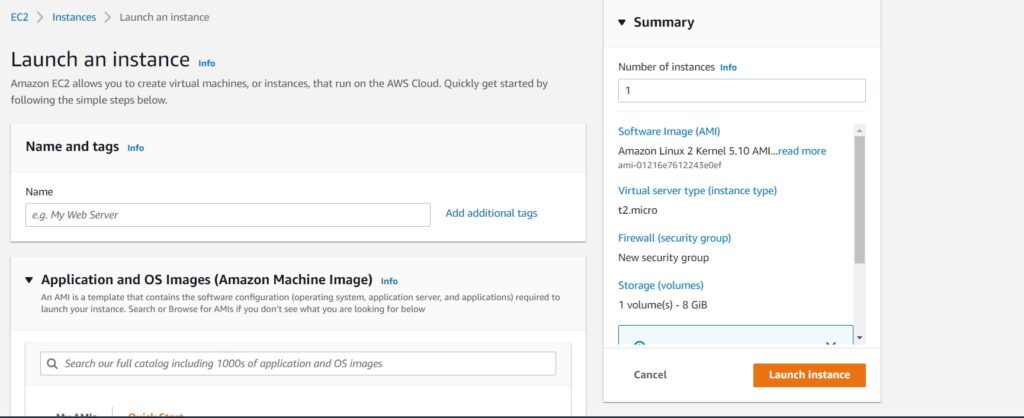
Under Instances is a list of the EC2 instances deployed in the account. There is also a Launch instances button on the top right section of this page; clicking on that button brings you to the EC2 instance launch flow (Figure 2).
![]()
(figure 2)
Create the EC2 instance:
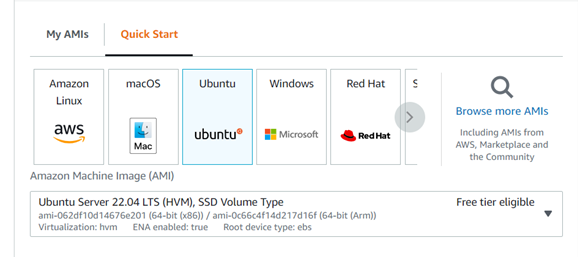
Launch Instance:
Choose Instance type:
Here you can choose your desired machine type. If you wish to get benefited using the free tier you can choose the t2.micro type instance.

Configure storage:
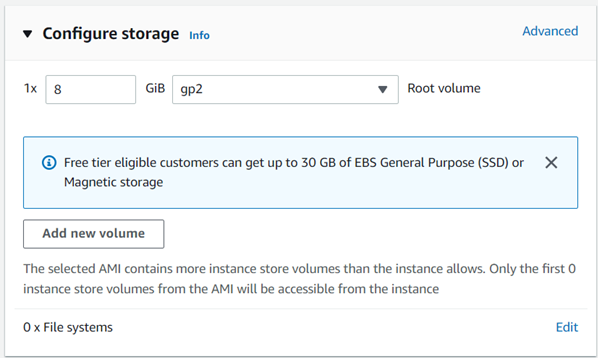
You can also leave this step to be with the default settings.
Add Tags:
Click click to add a name tag and enter a name in the value field.

Configure Security Group:
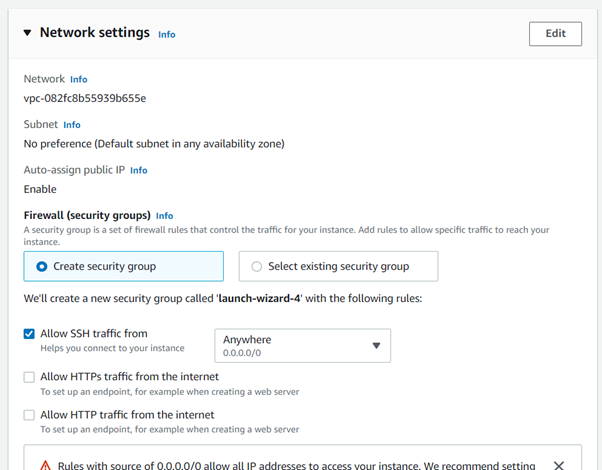
This is an important setup where you can allow connections to your instance by opening certain ports.
By default SSH port is enabled.
If you need your website to be viewed in the internet then you need to add rules to allow connections to HTTP and HTTPS.
Click Review and Launch.
Create PEM key and launch Instance:
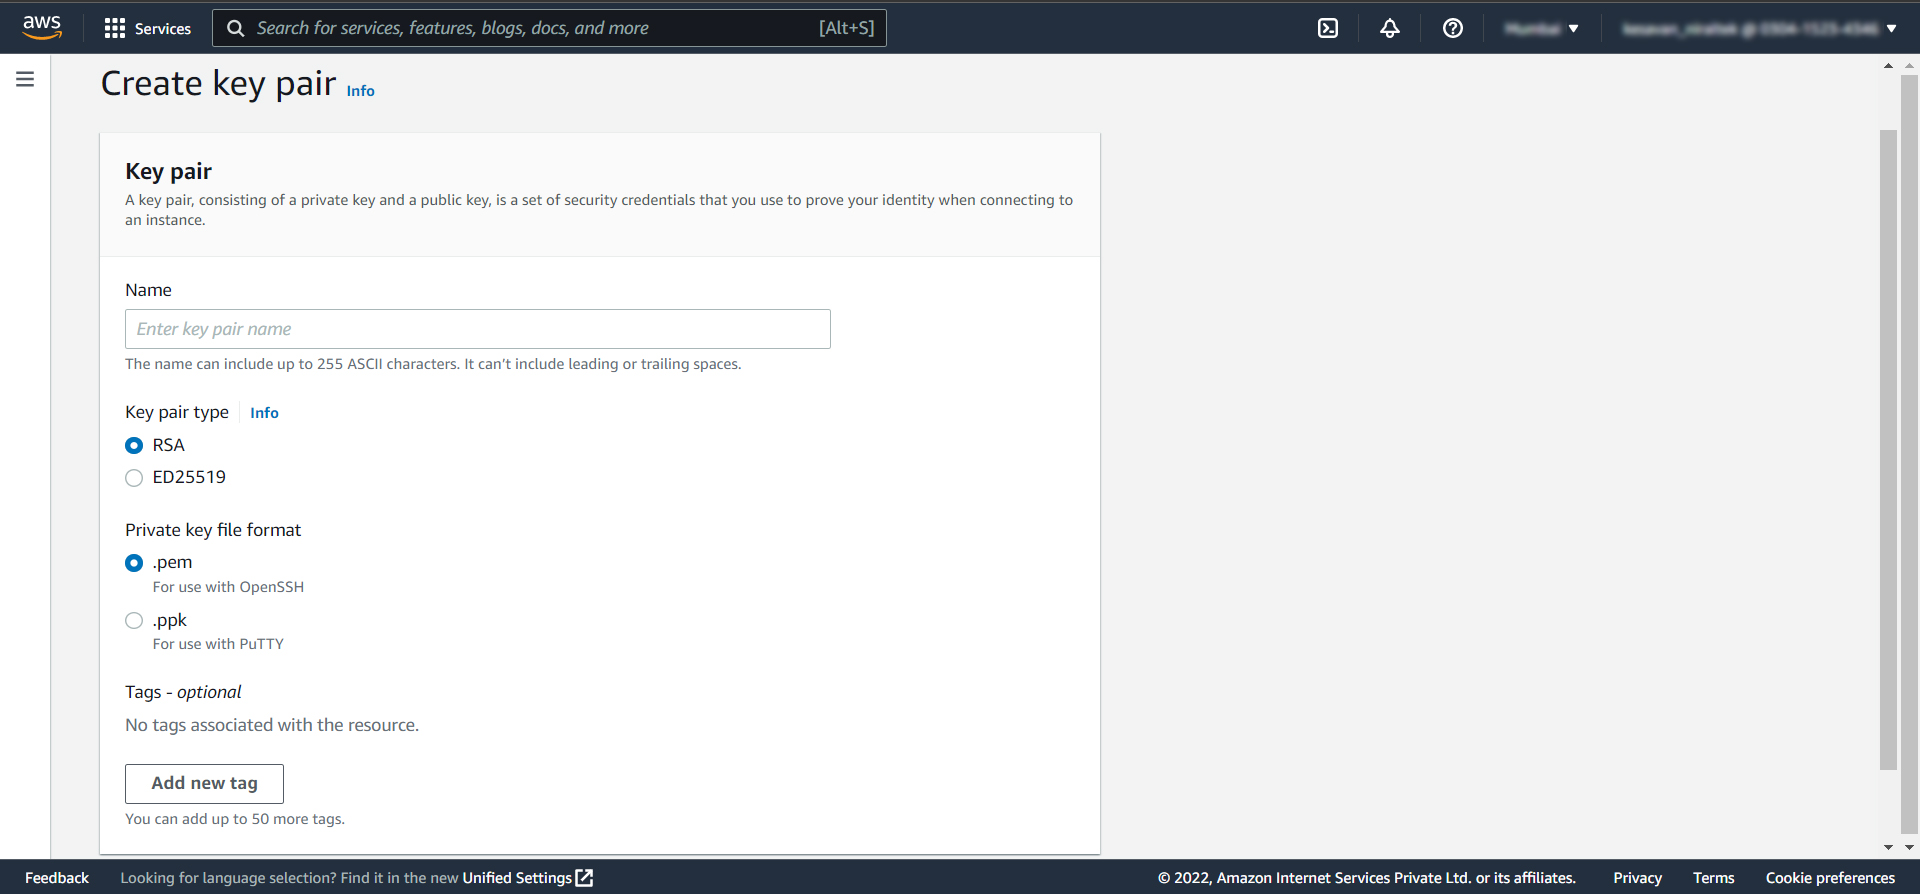
Now you will be prompted to assign a key pair to access your instance.
Select create a new key pair.
Enter the name to your key.
Click Download Key Pair.
Important: Save the key pair, if you miss this key you won’t be able to access your instance using SSH.
Click Launch instances.
Step5:
Accessing a Terminal on Windows
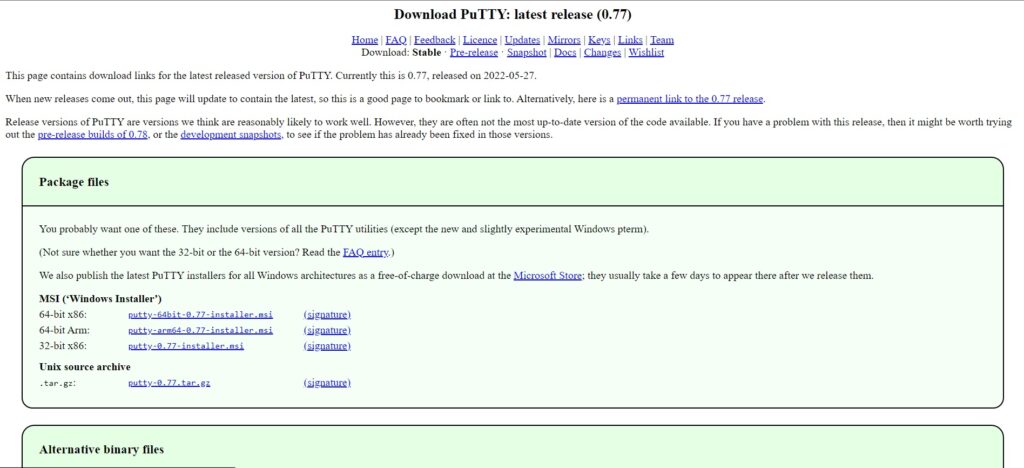
Windows don’t come with a built‑in terminal, so you need to download one from the Internet. Along with AWS, we recommend PuTTY, an ssh client used throughout the world.
- Access the PUTTY download page.
- Download and install the file in a location of your choice, then open it.
Download the putty:
Connect to your Linux instance
Use the following procedure to connect to your Linux instance using PuTTY. You need the .ppk file that you created for your private key. For more information, see Convert your private key using PuTTYgen in the preceding section. If you receive an error while attempting to connect to your instance, see Troubleshoot connecting to your instance.
To connect to your instance using PuTTY:
- Start PuTTY (from the Start menu, choose All Programs, PuTTY, PuTTY).
- In the Category pane, choose Session and complete the following fields:
a. In the Host Name box, do one of the following:
- (Public DNS) To connect using your instance’s public DNS name, enter instance-user-name@instance-public-dns-name.
- (IPv6) Alternatively, if your instance has an IPv6 address, to connect using your instance’s IPv6 address, enter instance-user-name@instance-IPv6-address.
For information about how to get the user name for your instance, and the public DNS name or IPv6 address of your instance, see Get information about your instance.
b. Ensure that the Port value is 22.
c. Under Connection type, select SSH.
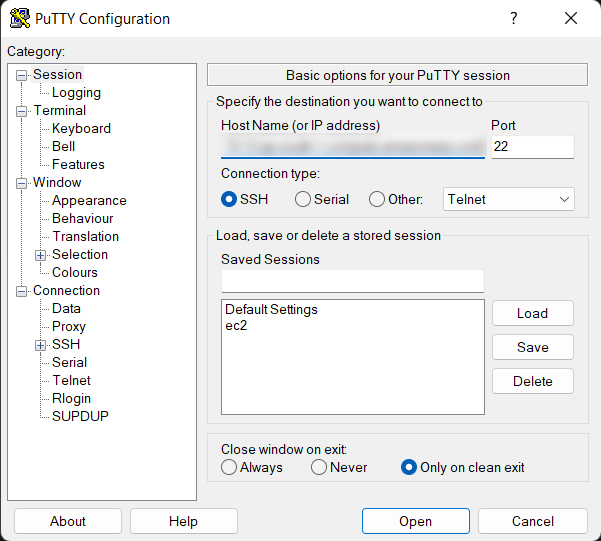
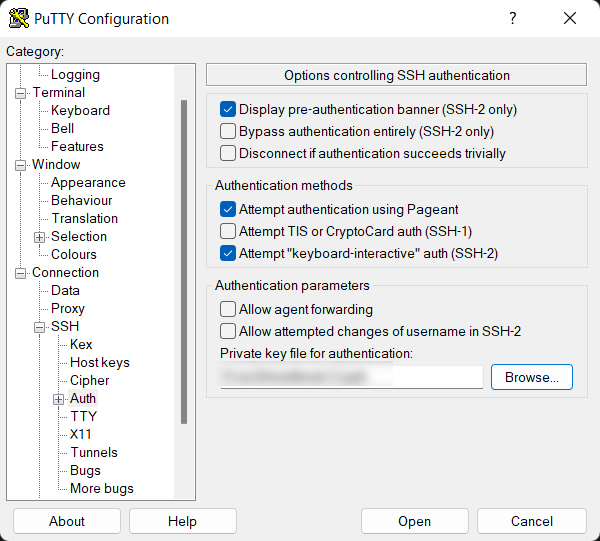
d. Specify the private key for your instance. For the Private key, enter the path to your private key, or choose the “…” button to browse for the file. To open the advanced site settings, for newer versions of WinSCP, choose Advanced. To find the Private key file setting, under SSH, choose Authentication.
Step6:
Installing NGINX Software:
Now that your AWS environment is set up, it’s time to install either NGINX Open Source or NGINX Plus, which you can try free for 30 days. Both options work in the context of this tutorial, but if you want to further explore the advanced features in NGINX Plus, please request a free trial.
Installing NGINX Open Source
Most Linux distributions and BSD variants make NGINX Open Source available in their standard package repositories, but it’s usually not the latest version. We recommend downloading NGINX Open Source directly from nginx.org. There are just a few extra steps for adding the NGINX repository to the Ubuntu package manager (apt).
To install NGINX Open Source, follow these steps:
1. Access your terminal.
2. Download the NGINX signing key
$ sudo wget http://nginx.org/keys/nginx_signing.key3. Add the key
$ sudo apt-key add nginx_signing.key4. Change directory to /etc/apt
$ cd /etc/apt5. Update the NGINX software
$ sudo apt-get update6. Install NGINX
$ sudo apt-get install nginx7. Type Y when prompted
8. Start NGINX
$ sudo systemctl start nginx.service9. Check its status
$ sudo systemctl status nginx.service10. Continue to Opening Your Web Page.

Navigate to the Instances tab on the EC2 Dashboard if you are not there already. (One way is to click Services in the top Console navigation bar, EC2 in the Compute section, and Instances in the left‑hand navigation column.)
Scroll right in the table until you can see the instance’s public IP address in the Public IPv4 address. Select the address and copy it into the paste buffer.
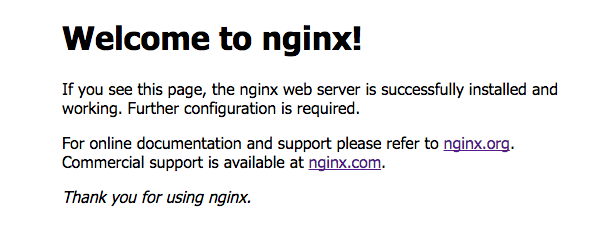
Open a new browser tab and paste the address into the address bar. The default Welcome to Nginx! the page appears, indicating that NGINX is installed and running but not yet configured.
11. Setting Up Sample Files
With a working version of NGINX or NGINX Plus installed, it’s time to put it to good use! Begin by setting up some files and directories.
1. Change the directory to your home directory if you are not already there. In the following instructions, it is /home/ubuntu.
2. Create a directory called public_html and change it.
3. In the public_html directory, create a file called HTML and a directory called data.
4. Change directory to /etc/nginx/conf.d
cd /etc/nginx/conf.d5. Rename default conf to default.conf.bak to prevent NGINX from using it as the default configuration file.
6. Create a file called server1.conf with this configuration in it:
$ sudo nano server1.conf

7. Reload NGINX
$ sudo nginx -s reloadStep7:
Install npm, nodejs and git on server
Let’s install npm
$ sudo apt-get install -y npmLet install node.js
$ sudo apt-get install -y nodejs
Let install git
$ sudo apt-get install -y git
Step8:
Install MySQL database on the server
$ sudo apt install mysql-serverAs soon as your installation is complete, the MySQL server should run automatically. You can check it with the following command.
$ sudo systemctl status mysqlIt must return some information about the MySQL server, such as Active: active (running). Let’s log in as root.
$ sudo mysqlYou must set a password for your root now. Replace your_password_here with a strong password. Now, let’s exit and log in with the root credentials.
$ sudo mysql -u root -pStep9:
Installing MySQL Workbench for Easier Management.
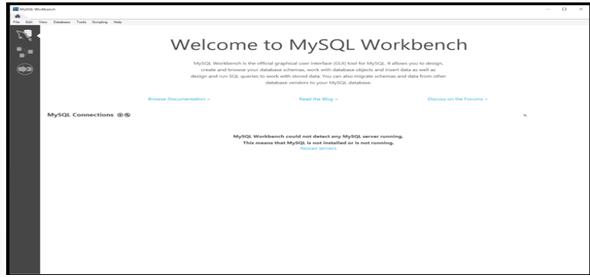
Click on + next to MySQL Connections.
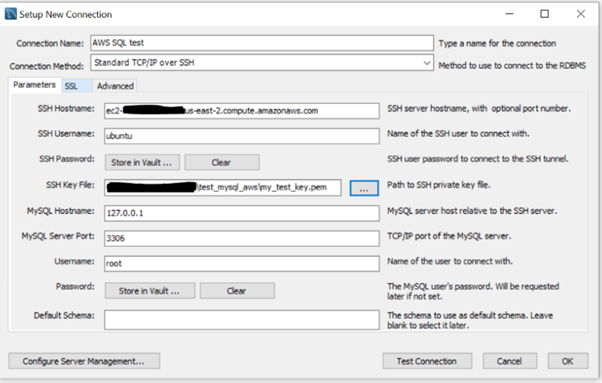
Give your connection an arbitrary name (e.g., AWS SQL test ). From the Connection method dropdown menu, choose “Standard TCP/IP over SSH.” The SSH Hostname is your EC2 Instance Public IPv4 DNS address. You can find this address on your EC2 dashboard by clicking on your instance and choosing details from the tab menu.
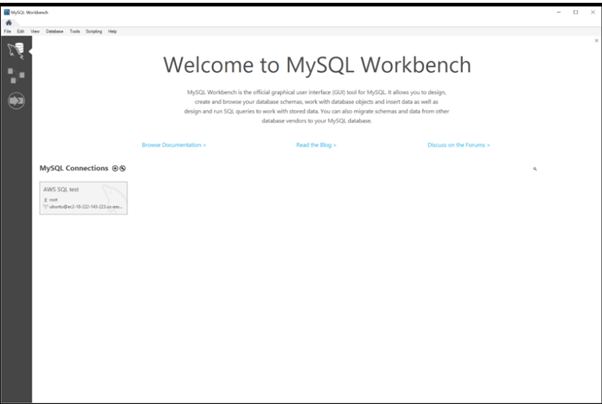
Besides, change the SSH Username to ubuntu and locate your SSH Key File (the .pem file you got from AWS to connect via SSH). Finally, make sure that your user name is root. Click OK, and your connection should appear on the first page.
After that, a copy should be taken from the existing database.
Step10:
Ok then it should be fetched from GitHub on the server
pull the code in the GitHub repository:
1. First make a directory:
$ sudo mkdir newdir
Open the directory if newly created, and edit server1.conf file or open public_html directory to create already,
2. Open the directory:
If the directory is newly created, then open it. Otherwise public_html is already created
Open the directory I open public_html
$ cd public_html3. Git initialize:
After that, you need to initialize git in that directory
$ sudo git init4. Git remote add
To add a new remote, use the git remote add command on the terminal, in the directory your repository is stored at. The git remote add command takes two arguments: A remote name, for example, origin.
$ sudo git remote add origin https://github.com/niraltek/sample-project.git5. Git configure
The git checkout command lets you navigate between the branches created by the git branch. Checking out a branch updates the files in the working directory to match the version stored in that branch, and it tells Git to record all new commits on that branch.
$ sudo git config core.sparseCheckout true6. Sparse checkout
This command is used to create sparse checkouts, which change the working tree from having all tracked files present to only having a subset of those files. It can also switch which subset of files are present, or undo and go back to having all tracked files present in the working copy.
$ sudo touch .git/info/sparse-checkout7. Pull in the build directory in GitHub.
This command is used to pull a folder or directory from GitHub
$ sudo bash -c 'echo "dist/" > .git/info/sparse-checkout'8. Generate personal access token:
Before pulling from GitHub generate a personal access token first:
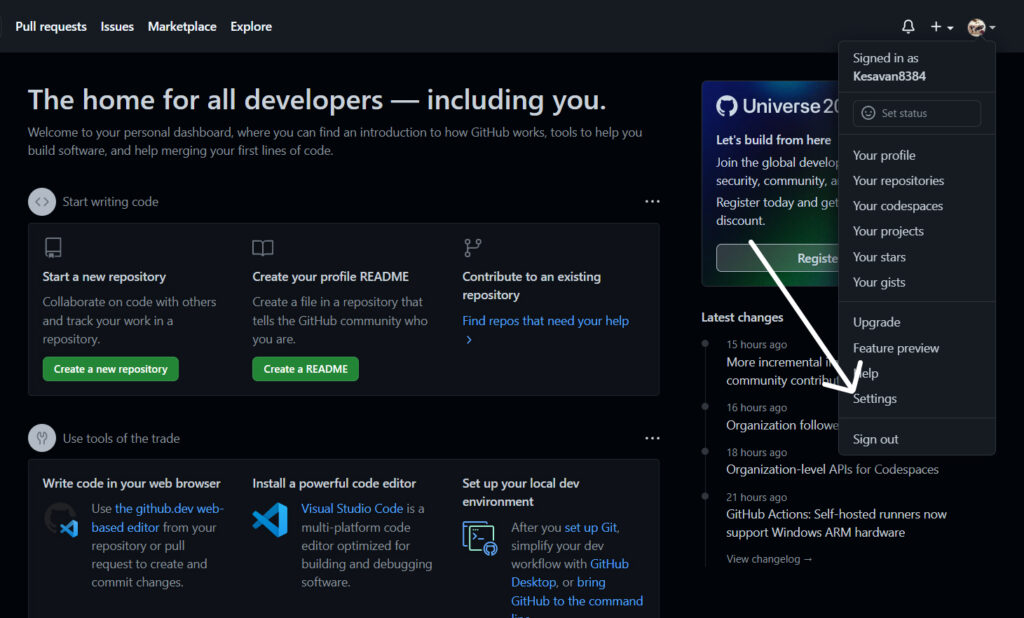
Click the setting,
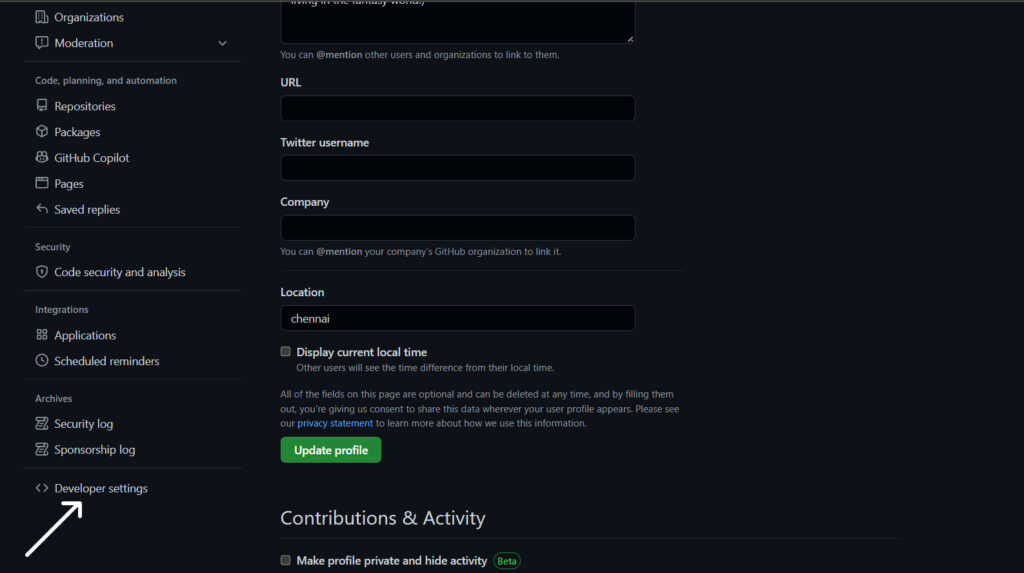
Click on the developer setting and click on generate a new token,

After that, you need to pull your code from GitHub.
9. Pull your code:
git pull origin master will fetch and update only a specific branch called master and origin in the remote repository. Often, the default branch in Git is a master branch, and it keeps updating frequently. A user can use any branch name to pull that branch from the remote
$ sudo git pull origin mainusername You must provide your GitHub username, the password is your GitHub personal access token.

Step11:
Create a directory for the server connection
1. First create a directory:
Create a directory named demo-database -server
$ sudo mkdir demo-database-server2. Open the directory:
After that open that directory
$ cd demo-database-server/3. Git initialize:
After that, you need to initialize git in that directory
$ sudo git init 4. Git remote add:
To add a new remote, use the git remote add command on the terminal, in the directory your repository is stored at. The git remote add command takes two arguments: A remote name, for example, origin.
$ sudo git remote add origin https://github.com/niraltek/sample-project.git5. Git configure:
The git checkout command lets you navigate between the branches created by the git branch. Checking out a branch updates the files in the working directory to match the version stored in that branch, and it tells Git to record all new commits on that branch.
$ sudo git config core.sparseCheckout true6. Sparse checkout:
This command is used to create sparse checkouts, which change the working tree from having all tracked files present to only have a subset of those files. It can also switch which subset of files are present, or undo and go back to having all tracked files present in the working copy.
$ sudo touch .git/info/sparse-checkout7. Pull in the build directory in GitHub:
This command is used to pull a folder or directory from GitHub
$ sudo bash -c 'echo "mysql-database/" > .git/info/sparse-checkout'8. Pull your code:
Git pull origin master will fetch and update only a specific branch called master and origin in the remote repository. Often, the default branch in Git is a master branch, and it keeps updating frequently. A user can use any branch name to pull that branch from the remote,
username You must provide your GitHub username, the password is your GitHub personal access token. We have already generated a personal access token and can use it.

After that,
9. Install pm2:
PM2 is a production process manager for Node.js applications with a built-in load balancer. It allows you to keep applications alive forever, reload them without downtime, and facilitate common system admin tasks.
$ sudo npm install pm2 -g10. Start a Server:
$ sudo pm2 start db-connection.js11. Continue to Opening Your Web Page:

Navigate to the Instances tab on the EC2 Dashboard if you are not there already. (One way is to click Services in the top Console navigation bar, EC2 in the Compute section, and Instances in the left‑hand navigation column).
Scroll right in the table until you can see the instance’s public IP address in the Public IPv4 address. Select the address and copy it into the paste buffer.

After installing angular in your local system follow the below procedure.
Step1:Create a new angular application:
ng new angular-app
Angular application view

Step:2
MySQL Database:
To be able to experiment with the code examples, you should have MySQL installed on your computer. You can download a free MySQL database at https://www.mysql.com/downloads/.Install MySQL Driver:
Once you have MySQL up and running on your computer, you can access it by using Node.js.
To access a MySQL database with Node.js, you need a MySQL driver. This tutorial will use the “MySQL” module, downloaded from NPM.
To download and install the “MySQL” module, open the Command Terminal and execute the following: First, install npm and then install MySQLCreate Node.js App:
First, create a folder and name it MySQL -database. Next, we initialize the Node.js App with a package.json file:npm init
package name: (mysql-database)
version: (1.0.0)
description: none
entry point: (index.js) db-connections.js
test command:
git repository:
keywords: nodejs, express, sequelize, mysql, rest, api
author: Niraltek Solutions
license: (ISC)
About to write to D:\mysql-database\package.json:

NPM Install MySQL:
We need to install the necessary modules:express, sequelize, mysql2. Run the command:
npm install express sequelize mysql2 cors --save

Now you have downloaded and installed a MySQL database driver.
Node.js can use this module to manipulate the MySQL database:

Create Connection:
Start by creating a connection to the database. Use the username and password from your MySQL database. db-connection.js Save the code above in a file called “db_connection.js” and run the file:
Run “db_connection.js”:
Which will give you this result:
node db-connection.js
Now you can start querying the database using SQL statements.
Database Query:

The query method takes an SQL statement as a parameter and returns the result.
Step3:After that just upload the source file to Github[Hope you have created an account on Github.com and a new repository. Install Git in your local system as well]. Git ADD file: All files should be added to GitHub
git add --a
Git Commit:
The git commit command captures a snapshot of the project’s currently committed changes.git commit -m "first-commit"
Git Push:
The git push command is used to upload local repository content to a remote repository. Pushing is simply transferring commits from your local repository to a remote repo. This is parallel to receiving the kit, but receiving imports commits to local branches, pushing exports to remote branches.git push
Step4:
Create AWS EC2 Instance:
 AWS has made launching EC2 instances an easy task, but there are still many steps to the final result. Learn how to successfully create an EC2 instance from AWS Console.
Select a region:
One of the most important steps is to select the desired AWS region. This can be done from the top navigation bar of the AWS Console.Navigate to the EC2 Console:
Once you select the desired AWS region, go to the EC2 Console. From the same landing page, search for EC2 (Figure 1). Your landing page in the management interface will likely display EC2 among the most commonly used services in the account.
(figure 1)
Once you arrive at the EC2 Console, from the left navigation menu, choose the Instances option. Under Instances is a list of the EC2 instances deployed in the account. There is also a Launch instances button on the top right section of this page; clicking on that button brings you to the EC2 instance launch flow (Figure 2).(figure 2)
Create the EC2 instance:
Launch Instance:

Choose Instance type:
Here you can choose your desired machine type. If you wish to get benefited using the free tier you can choose the t2.micro type instance.
Configure storage:
 You can also leave this step to be with the default settings.
Add Tags:
Click click to add a name tag and enter a name in the value field.
Configure Security Group:
 This is an important setup where you can allow connections to your instance by opening certain ports.
By default SSH port is enabled.
If you need your website to be viewed in the internet then you need to add rules to allow connections to HTTP and HTTPS.
Click Review and Launch.
Create PEM key and launch Instance:
 Now you will be prompted to assign a key pair to access your instance.
Select create a new key pair.
Enter the name to your key.
Click Download Key Pair.
Important: Save the key pair, if you miss this key you won’t be able to access your instance using SSH.
Click Launch instances.
Step5:
Accessing a Terminal on Windows
Windows don’t come with a built‑in terminal, so you need to download one from the Internet. Along with AWS, we recommend PuTTY, an ssh client used throughout the world.- Access the PUTTY download page.
- Download and install the file in a location of your choice, then open it.
Download the putty:

Connect to your Linux instance
Use the following procedure to connect to your Linux instance using PuTTY. You need the .ppk file that you created for your private key. For more information, see Convert your private key using PuTTYgen in the preceding section. If you receive an error while attempting to connect to your instance, see Troubleshoot connecting to your instance.To connect to your instance using PuTTY:
- Start PuTTY (from the Start menu, choose All Programs, PuTTY, PuTTY).
- In the Category pane, choose Session and complete the following fields:
a. In the Host Name box, do one of the following:
- (Public DNS) To connect using your instance’s public DNS name, enter instance-user-name@instance-public-dns-name.
- (IPv6) Alternatively, if your instance has an IPv6 address, to connect using your instance’s IPv6 address, enter instance-user-name@instance-IPv6-address.
b. Ensure that the Port value is 22.
c. Under Connection type, select SSH.
 d. Specify the private key for your instance. For the Private key, enter the path to your private key, or choose the “…” button to browse for the file. To open the advanced site settings, for newer versions of WinSCP, choose Advanced. To find the Private key file setting, under SSH, choose Authentication.

Step6:
Installing NGINX Software:
Now that your AWS environment is set up, it’s time to install either NGINX Open Source or NGINX Plus, which you can try free for 30 days. Both options work in the context of this tutorial, but if you want to further explore the advanced features in NGINX Plus, please request a free trial.Installing NGINX Open Source
Most Linux distributions and BSD variants make NGINX Open Source available in their standard package repositories, but it’s usually not the latest version. We recommend downloading NGINX Open Source directly from nginx.org. There are just a few extra steps for adding the NGINX repository to the Ubuntu package manager (apt). To install NGINX Open Source, follow these steps: 1. Access your terminal. 2. Download the NGINX signing key$ sudo wget http://nginx.org/keys/nginx_signing.key$ sudo apt-key add nginx_signing.key$ cd /etc/apt$ sudo apt-get update$ sudo apt-get install nginx$ sudo systemctl start nginx.service$ sudo systemctl status nginx.service Navigate to the Instances tab on the EC2 Dashboard if you are not there already. (One way is to click Services in the top Console navigation bar, EC2 in the Compute section, and Instances in the left‑hand navigation column.)
Scroll right in the table until you can see the instance’s public IP address in the Public IPv4 address. Select the address and copy it into the paste buffer.
Open a new browser tab and paste the address into the address bar. The default Welcome to Nginx! the page appears, indicating that NGINX is installed and running but not yet configured.
 11. Setting Up Sample Files
With a working version of NGINX or NGINX Plus installed, it’s time to put it to good use! Begin by setting up some files and directories.
1. Change the directory to your home directory if you are not already there. In the following instructions, it is /home/ubuntu.
2. Create a directory called public_html and change it.
3. In the public_html directory, create a file called HTML and a directory called data.
4. Change directory to /etc/nginx/conf.d
cd /etc/nginx/conf.d$ sudo nano server1.conf
 7. Reload NGINX
$ sudo nginx -s reloadStep7:Install npm, nodejs and git on server Let’s install npm
$ sudo apt-get install -y npm$ sudo apt-get install -y nodejs
$ sudo apt-get install -y git
Step8:Install MySQL database on the server
$ sudo apt install mysql-server$ sudo systemctl status mysql$ sudo mysql$ sudo mysql -u root -pStep9:Installing MySQL Workbench for Easier Management
 Click on + next to MySQL Connections.
 Give your connection an arbitrary name (e.g., AWS SQL test ). From the Connection method dropdown menu, choose “Standard TCP/IP over SSH.” The SSH Hostname is your EC2 Instance Public IPv4 DNS address. You can find this address on your EC2 dashboard by clicking on your instance and choosing details from the tab menu.
Besides, change the SSH Username to ubuntu and locate your SSH Key File (the .pem file you got from AWS to connect via SSH). Finally, make sure that your user name is root. Click OK, and your connection should appear on the first page.
 After that, a copy should be taken from the existing database.
Step10:Ok then it should be fetched from GitHub on the server pull the code in the GitHub repository: 1. First make a directory:
$ sudo mkdir newdir Open the directory if newly created, and edit server1.conf file or open public_html directory to create already,
2. Open the directory:
If the directory is newly created, then open it. Otherwise public_html is already created
Open the directory I open public_html
$ cd public_html$ sudo git init$ sudo git remote add origin https://github.com/niraltek/sample-project.git$ sudo git config core.sparseCheckout true$ sudo touch .git/info/sparse-checkout$ sudo bash -c 'echo "dist/" > .git/info/sparse-checkout' Click the setting,
 Click on the developer setting and click on generate a new token,
 After that, you need to pull your code from GitHub.
9. Pull your code:
git pull origin master will fetch and update only a specific branch called master and origin in the remote repository. Often, the default branch in Git is a master branch, and it keeps updating frequently. A user can use any branch name to pull that branch from the remote
$ sudo git pull origin main
Step11:Create a directory for the server connection 1. First create a directory: Create a directory named demo-database -server
$ sudo mkdir demo-database-server$ cd demo-database-server/$ sudo git init $ sudo git remote add origin https://github.com/niraltek/sample-project.git$ sudo git config core.sparseCheckout true$ sudo touch .git/info/sparse-checkout$ sudo bash -c 'echo "mysql-database/" > .git/info/sparse-checkout' After that,
9. Install pm2:
PM2 is a production process manager for Node.js applications with a built-in load balancer. It allows you to keep applications alive forever, reload them without downtime, and facilitate common system admin tasks.
$ sudo npm install pm2 -g$ sudo pm2 start db-connection.js Navigate to the Instances tab on the EC2 Dashboard if you are not there already. (One way is to click Services in the top Console navigation bar, EC2 in the Compute section, and Instances in the left‑hand navigation column).
Scroll right in the table until you can see the instance’s public IP address in the Public IPv4 address. Select the address and copy it into the paste buffer.

